Not quite right, the brass was too soft and the chasing was too aggressive. The edges deformed and the marks were too deep and thus didn't resemble the originals very well. Off to start again
The next step was to make many blanks that would become the masters for the casting and do the chasing on the lids. This wasn't as easy as we wanted, the brass that shapeways casts is softer than the hardware brass so the tool marks are deeper.
We reviewed the existing photos for all the inkwells I have seen in caskets and discussed what was common to them and what versions were rare. We decided to go with some of the common patterns and tool marks. This includes a rocking chasing mark that looks like a V.
The first set weren't going to work as they were too deep and even deformed the blank some. So several more blanks were ordered. Each time that happens, it is about a month or more to get! And they are pricy as well since their are so many steps with the 3D printing of the wax, lost wax castings, polishing, etc.
The second time the chasing looked much more the depth of the originals and we thought it was worth sending them on to England to have the first batch of 10 pairs cast. We needed to run through the assembly process with the batch braising and see how that worked and get good numbers on labor to assemble.
Much better the second time around.
No edge deformation. The piece isn't assembled yet as we needed them to be the blanks for the castings.
I can't tell you how excited I was to get a set of them - in tin coating and non-coated brass last week and slip them into the casket for the first time! I left my casket open for a week to admire them!
Final versions, here a brass set (in a tin./silver casket).
So now off to get them made in brass. We sent the CAD models to Shapeways and paid some expedited shipping to get them faster. School was soon to start again!
First brass parts made using the CAD drawings. First Shapeways 3D printed them in wax and then sent them to be cast via the lost wax process. Each part goes through additional handling to remove any spouts and and overall brushing. Later parts would be polished but not at first.
They fit!!
It was an exciting day when the first parts arrived. There were many things we needed to 'test' with these early prototypes. First, would the pegs go through the holes! Could we tap/smash the pin for the lids to keep them together and keep them rotating. A big one was if the stopper peg could be bent over without breaking. That was a 90 degree bend and brass can embrittle (I won't elaborate on the metallurgy speak - but there were lots of discussions on this at home and with the brass foundry). And the big thing - could we braise them together.
So now we get into 'David, your mom is weird and I like her'....David and I had to find some local braising help. So let's jump into the car and go to an industrial welding supply place and learn things. They found us funny. David wandered the isles with huge eyes and begged for acetylene torches for his upcoming birthday while I discussed the intricacies of braising flux with the guys. No, you can't have a huge torch as the other kids will play with your toys in the basement!! And you can't have that in your dorm. So instead we took off for a place my kids graduated to after the LEGO store - a place called You Do It Electronics. This is a fantastic spot - like what Radio Shack was in the 50's I bet and the same guys still work there. ha ha. Of course they would have small hand held butane torches and the flux and
solder we were looking for. Good enough for our tests and the torch was something that I gave him strict instructions to hide from the younger robot team which is full of 'fiddlers'. (What's this?? Phoof!).
Give a teen boy a flame and they are happy. So we spent a day in the basement trying against luck to put these pieces together. In the end, it was ugly but they were together and we bent over the stopper without it breaking after different experiments heating things up.
Make-shift stand while we are trying to solder this inkwell together
Heating the pin. This discolors the brass and may have been unnecessary as the cast brass was softer than rolled brass/
Bending the stopper pin over.
Ok, the first result. Kinda ugly but we learned a great deal. Not ready for prime time but a step in the journey.
So we had to do some modifications to the pieces, the walls of the bottom were just too thick and unnecessary and would drive up the cost. So there was thinning of the model and trying to make the pegs still work. We got on the phone with the brass guys and we all agreed that the round peg bent over just didn't look good at all if you knew what the originals should look like. It just wasn't right. So David had to go back and see if he could make a rectangular peg work.
Another round of CAD drawings, 3D prints at home, sending them off to Shapeways and weeks later a set comes back with some of our improvements. This time I also remembered to have David make a version of the lid for the pounce pot too. Because of how 3D printing works, we were worried that the half dome wouldn't print well as it was unsupported as it prints but it was just shallow enough and small enough to work (we held our breath for the sample coming out of the bag).
Round 2 of 3D prints turned into brasses. Note the rectangular pin now and you can't see the the base walls are thinner and thus takes less brass to make.
The pounce lid - it worked!! If you look close, you might see the faint ridges around the rim that are the signs of 3D printing
So now it is a few weeks into school and David's roommate comes to see our place and the basement of wonderful toys. David had lucked into the best roommate ever! Someone who likes to tinker as much as he does and they were coming to squirrel away lots of tools and goodies from our stuff. We actually have to search them when they leave and often while working on the robot and can't find stuff - we blame them and text. "Yes... I took the soldering iron" (how did I miss that in the backpack!?).
So I had these pieces and asked the roomie if he knew about braising brass? It wasn't long and they were both downstairs happier than pigs in s*it doing my work testing out the next set of prototypes. These went much better and I was ready to start ordering blanks that were polished for the next test... engraving.
So fast forward a few years and the landscape had changed a bit, there are more technologies in the hands of engineers and home-based makers to make things. So by this time I had spoken with the person who makes my hardware and he was willing to make the brass bits but we couldn't quite get off the ground as he needed to make a prototype to use as a master for molding.
One of the early CAD models and a discussion of the
folded over stopper
During this time frame, my house was converted from Lego robot central to a metal robot place. That meant skills were being learned by all the kids and equipment was moving in to our makeshift labs in the basement. In 2012 when I had tabled the inkwells to the side, I had just bought my 12 year old son the first 3-D printer kit available. By 2018 he was an expert and headed to college in mechanical engineering, had built and designed four 3-D printers, and made them operate at perfections that were beyond their original specs. To do this, one of the things he had to learn was computer aided design. And to help kids learn, and thus be partial to their software later in their professional careers, the big CAD companies were providing student licenses to FIRST teams. So we now had a CAD system in the house and a bunch of kids running around learning how to use it as well as multiple computer aided manufacturing tools.
Also developing during this time frame was the services available to people with CAD or 3-D printers. If your printer wasn't good enough or you didn't have one, you could send your design to a company called Shapeways and they would print it. This is the beginning of a revolution in 'additive manufacturing' or 'desktop manufacturing'. If you look at the Shapeways site, you can see that they innovated 3-D printing in wax. And once you have a high resolution wax, you can use lost wax casting and make metal parts! So jewelry makers are now using CAD and 3-D printing to make rings and other complex jewelry that would have been hard to make before.
Later when you see the bottle story, you will realize the ah-ha moment. A moment when I needed to make changes and instead of going back to the professional company I had originally worked with, I realized I could do them here. And it was that point that I did the huge head slap and realized I could unstick the inkwells in my own basement!
Printing the first model
It was December 2018 and my son was returning from a first semester in London and he was stir crazy. It had been a very stressful first semester (the academic program had fallen apart and took intervention from the US university, making it really chaotic for the kids) and he had no things to 'make' with him. As embroiderers, we can understand that need to tinker and create to release stress. So as soon as he arrived home, I proposed the inkwell project as a way to give him a goal to make something.
He dove in, and of course by this time it was child's play for him. But never the less, he was excited to work on something - anything... So we got out all the pictures of historic pieces, he measured stuff, looked at proportions, and started making me CAD models of the inkwells. Once models were made, he started 3-D printing them with his best printer (after he fixed it, tuned it, and generally walked around complaining about all of us neophytes who messed it up while he was in Europe!). So from my conversations with the brass boundary, the assembly of these little inkwells in the way they were made in the 17th century posed problems. We would need to make three tiny pins, two of which looked like nails. One would go through the rotating lid and be smashed on the back to form the hand on the lid. The second would go through both the sliding lid and the square lid and be smashed to allow them to connect and swing. The third was rectangular and was soldered in place, bent over. That was a lot of fiddly work.
The first finished model of the inkwell. note the extra piece and that the lid with hole had a peg coming out of it.
So after playing with the 3-D printing objects, we had started down the road of integrating some of the pieces into each other, since I was considering casting the pieces and not cutting them out of brass sheet stock. This was doable, make the handle of the lid part of the lid and maybe make the pin that had to be smashed to hold the lid for the pivot part of the square lid. You see that thought process in the blue 3-D print.
A printed 3x version of the inkwell in the
new manufacturing idea
But the bent rectangle piece was still going to be a pain. That is when David came up with a great
idea. What if he made the pegs come out of the square bottom and we get rid of the irregular pewter piece. We could put holes in the square lid and the pegs would serve as a way to orient all the pieces before the brass-to-brass soldering (actually called brazing) happened. This was a brilliant idea! Oven brazing of dozens of brass parts can be done at once, it is a known process and can be outsourced. The pegs would keep the parts in place and then we would just need to tap smash the one pin and bend the other over.
Now that we had an interesting manufacturing process idea, would it work?? Needless to say, we spent days of the Christmas vacation working on it. First was making a new set of CAD models and printing them at a larger scale to work on the peg system. David was concerned the the resolution of the holes would be a problem on his machine.
So now that it was big scale, we needed a small scale brass version to test with.
The cuts of the shears can be seen on the edges of the pieces (Private Colleciton)
The rest of the inkwell was a bit more complicated. Looking at them, it was pretty clear that rolled brass sheet was being cut by massive metal working shears. Often the cuts were a bit rough and not always straight. This showed up even more clearly in the little rotating cap. Many were truly cut with the same lack of precision as any cheep items that would go into this box. It does tell you quite a bit about the perspective these boxes held in the period.
Looking at the engraving, it was a common rocking engraving with a sharp tool that was pivoted (rocked) as the person hit the end and made the V grove with the extra divot at the bottom of the V where the rocking happened. The engravers didn't take a lot of care as noted by the overlapping of the lines in many places.
I went out and talked to several engravers until I found someone willing to discuss the project. I was thinking of using him to engrave a set of brass blanks that could be used for casting masters. One problem I had was that the pieces just couldn't be cut out with shears like before. They would have to be laser cut, stamped out or cast. Which way to go???
Rough edges of the slip cast pewter being filled by the solder that was used too connect the tin-plated brass top
And how would I put them together? Looking at originals, it was pretty obvious that the slip cast pewter pieces often were rough at the top; requiring quite a bit of solder to fill the gaps and often they weren't filled. I was also concerned that any process would use a low enough temperature solder to keep from heat treating the brass and thus discoloring it during the making as it was very thin. A solder for brass to pewter isn't something known about so I tabled the project for awhile as I was also working on the cap to the bottles - which was also pewter. And of course, the casket project courses were now in full swing and I was both busy and we didn't have a final number of caskets of the type that needed inkwells. I already knew that the pewter bottoms would have to be cast in numbers of 500 at Danforth Pewter. So knowing the final number was important. Therefore, I had some years before I would need to pick this up again.
Inkwell from a 17th century casket. The center hole allowed the quill to be dipped into the ink (Private Collection)
In the 17th century there were three general box types; the valuables cabinet, the toilet box (jewelry and makeup), and the writing cabinet. The embroidered caskets for girls seemed to be a mix of all these functions, including a tray for writing needs and bottles for makeup/scent as well as areas specifically for holding rings.
In at least two collections (the V&A and a private collection), there are quills that have been decoratively wrapped with filament silk in patterns which fit into the writing tray. These wrappings are similar to what some kids do today with embroidery floss on pencils to help their grip.
Pounce pot with the half sphere depression and shaker holes (Private Collection)
There are two metal pots that are put into the embroidered cabinets. One is a cube with a lid that has an open hole in it, closed by a swinging lid. This would have held ink for dipping the quill into it. The second was the pounce pot. Paper at this period was rough and had not been prepared smooth for gliding the quill over the surface, so a fine powder usually made from cuttlefish bone would be sprinkled over the paper and rubbed. This powder was then at that point or after the writing, poured or tapped off the paper back into the depression on the pounce pot and shaken into the pot.
Taking very accurate measurements off of over a dozen inkwells in private and public collections. This is a special tool where the measurements show up well in reflected light under microscopes. (Private Collection)
There are several characteristics of these little pots. The bottom is an open cube which has been soldered to the lid with a hole or shaker in it. There is a swinging round lid with a stopper that is caught by a bent over piece of metal. A pin that is smashed connects the two lids and a second pin goes through the swinging lid to make the handle.
In other words, these are tiny but complicated when you are thinking of reproducing them. There are six pieces per pot.
I had spent a great deal of time measuring these little pieces and we chose a set that was a good representative size and whose cube bottom would make a good size for our double casket proportions.
The next task would be to figure out what all the pieces were made from and the processes that were used so we could start thinking about re-engineering them.
Looking through the hole in an ink well at the inside of the cube The layers and bubbles in the metal were clues that told us these were pewter that were slip cast.
There were pieces that were silver colored, yet dull and ones that were brass but the bottom was still a dull silver color.
Reasoning said that the tops were brass sheet and the bottoms appeared like pewter, which was a common metal in use at the time. Showing detailed photos to Judy Danforth (of Danforth Pewter based in Vermont), she confirmed that the bases were slip cast pewter in a sand mold. The excess pewter would be poured out as it solidified against the sides of the mold, leaving the characteristic ripples we saw in the bottom of the cubes.
Another piece, looking through the hole with a microscope to see the technique of construction.
This is something that Danforth could do, but they weren't sure about how to make or connect the rest of the lids/pins. They had never had experience soldering brass and pewter together.
So while I had a willing partner for the bottom part of the inkwell, I needed to go off and find solutions for the top.
More about those parts tomorrow (We are up to 2012 now...)
One of the most fabulous things of an embroidered casket is its 'jewelry', that is the little bits that
Casket in the MET collection (64.101.1335). Gift of Irwin Untermyer, 1964. You can see the two bottles and the inkwell and pounce pot in the front of the interior.
make it so authentic and truthfully make you squeal in the way you do when you see little details in a dollhouse. It's the ornate hardware, the little bottles for toilet water, and the inkwell and pounce pot.
I have had the opportunity to see so many historic pieces in public and private collections and it is one of the first things I oooh and ahhhh about - when a piece has its original bottles and inkwells. Over time, Richard and I realized that the interior dimensions of all the dividers were based around these little items. The depth and width of other areas were dependent on knowing what the size of the bottle would be. So that leads to us understanding that this 17th century effort was something more coordinated as the exterior sizes of the embroidered pieces were driven by knowing things made by other artisans.
A highly decorated pounce pout in an interior tray from a casket in the MET collection (64.101.1335). Gift of Irwin Untermyer, 1964
We HAVE to have these frosting pieces for our elaborately decorated cakes! Even before the first box was built, I have been 'on it' as part of the items that have to be reproduced to finish the project off. I know many people ask me over and over when they will be ready or done and I am pretty close to the vest as engineering and reproduction can take many twists and turns. At the beginning I did enough work to get to the 'we can do it' point and then have slowly worked on it until the group was ready. Some things have to be made in larger batches and it didn't make sense for me to provide the inkwells before you knew what casket you were buying.
Richard and I have decided on four casket types, based on the versions we have cataloged from the 17th century boxes. Two are more simple and only require 1-2 bottles and no inkwells. Not all caskets in the 17th century had inkwells, but almost all had bottles. The inkwells require a tiny tray to be built to house them and every time you cut lots of small parts and construct them, you vastly increase the cost of the final box. So now, just like then, we have made only the double casket and flat casket with doors to have spots to put inkwells inside.
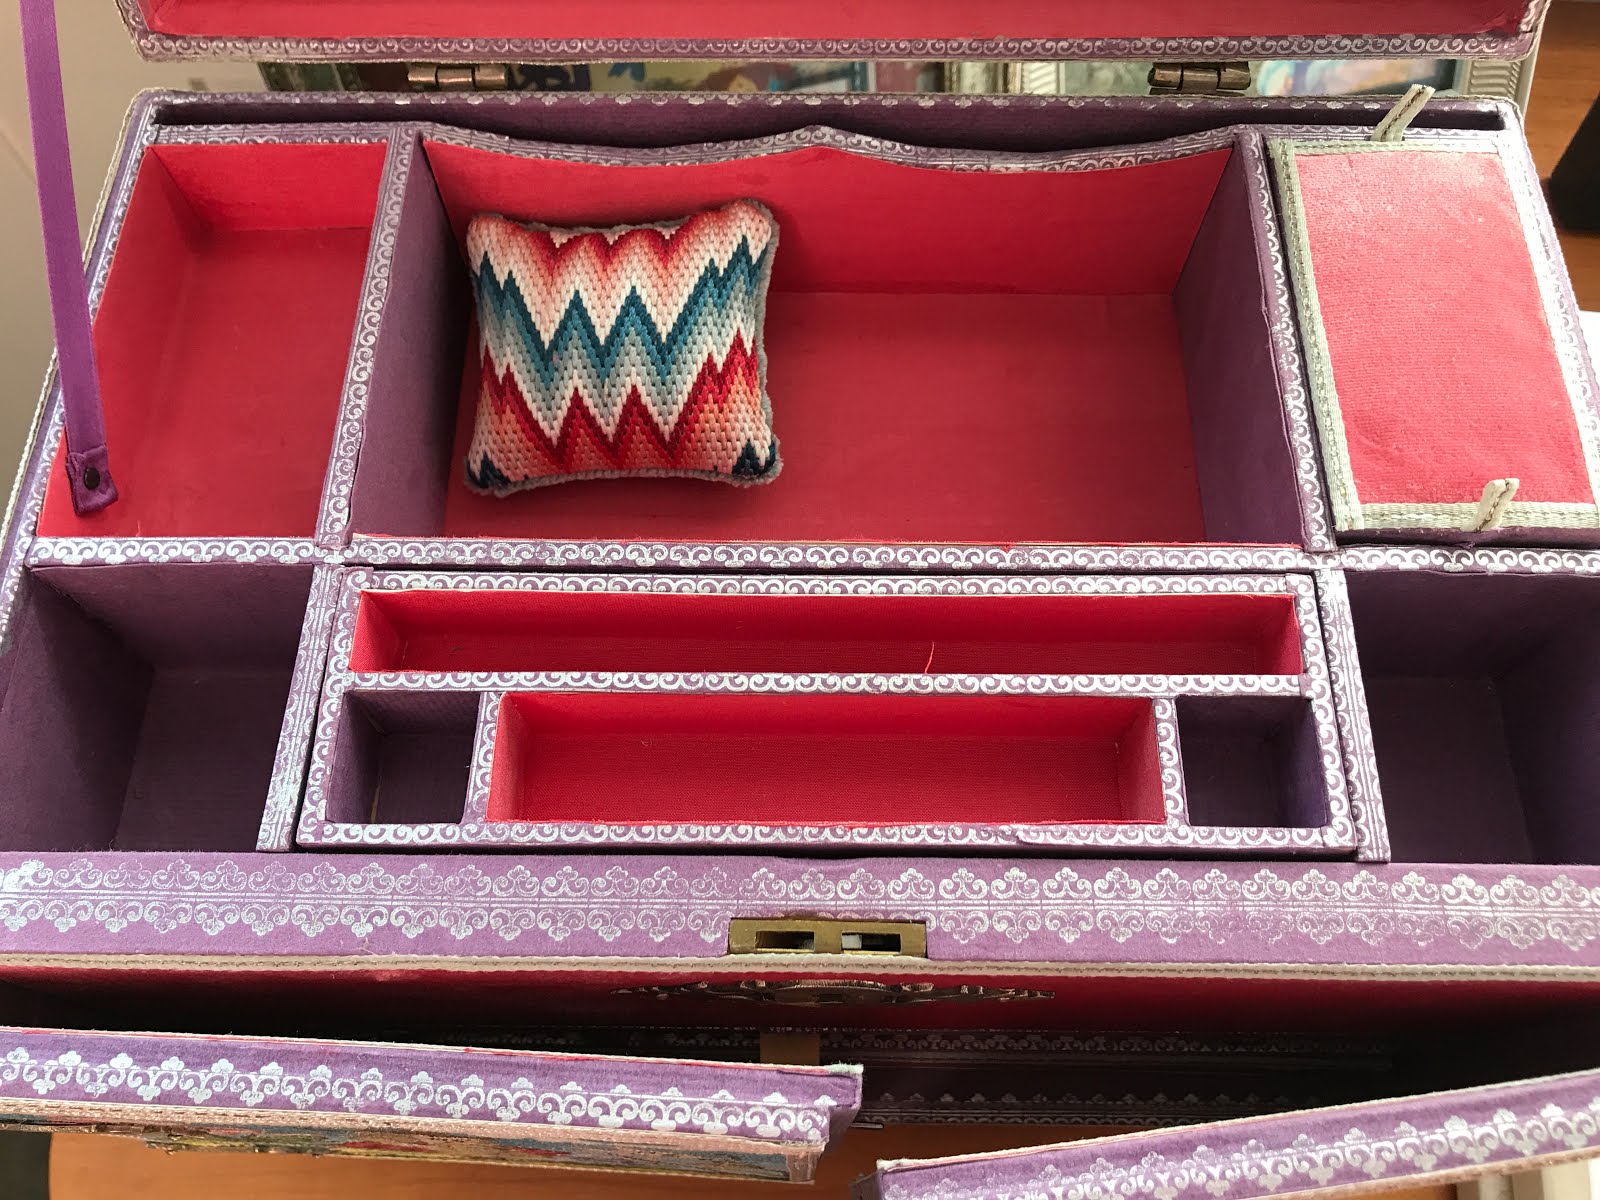
Many might look at the little tray and wonder what goes there in the super small less than 1" square spot - well the inkwells do. This series of blogs starts the 'how the inkwells were made'. And for those who have been waiting...
Yes... they are ready.
The empty large compartments in purple on left and right are to hold bottles. The super small purple squares are for the inkwell and pounce pot.